Setup a Satochip hardware wallet with Sparrow
Setup a Satochip hardware wallet with Sparrow

Cold store your Bitcoin with Satochip and Sparrow

Introduction

This step-by-step tutorial explains how to setup a Satochip hardware wallet with Sparrow to create a secure Bitcoin cold storage solution. If you haven’t read the Sparrow Quick Start🔗 guide yet, that’s a good place to learn how to install and get introduced this amazing Bitcoin client.

Setting up your Bitcoin wallet with your Satochip smartcard

Once Sparrow is installed, you’ll need to insert your Satochip 🔗 card into your card reader, then launch the Sparrow application.
This brings us to the creation of your new bitcoin wallet.

Please note: as with any Bitcoin wallet creation, the process that follows will require you to save your recovery phrase (also known as seedphrase 🔗or mnemonic), so that you can recover access to your funds in the event of loss or theft of your hardware wallet. We suggest you to store your seedphrase using Seedkeeper; your seedphrases and password manager on a smartcard.

Connecting to a server

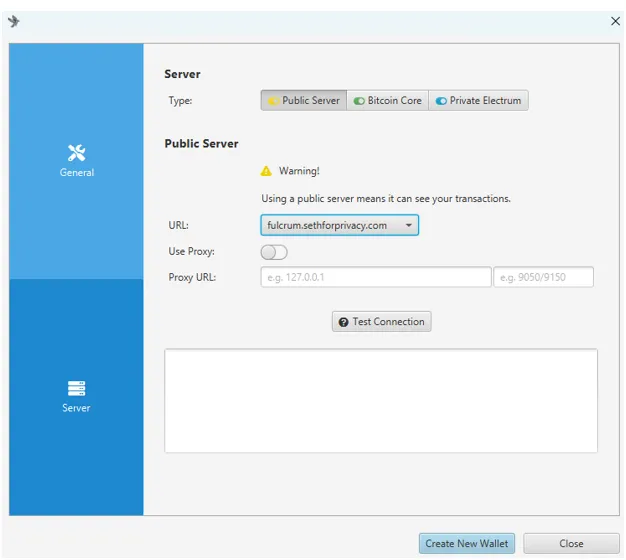
When you open Sparrow Wallet for the first time, you’ll be asked to choose between connecting to Electrum’s public or private servers. You don’t need to choose anything other than the public connection to quickly set up your wallet and carry out your first transactions.

If you run your own Bitcoin node and care about privacy and anonymity, you’ll probably choose to connect to your own — private — server.

You made your choice!? Great, let’s move on and click on “Create New Wallet” to choose a name for your wallet.
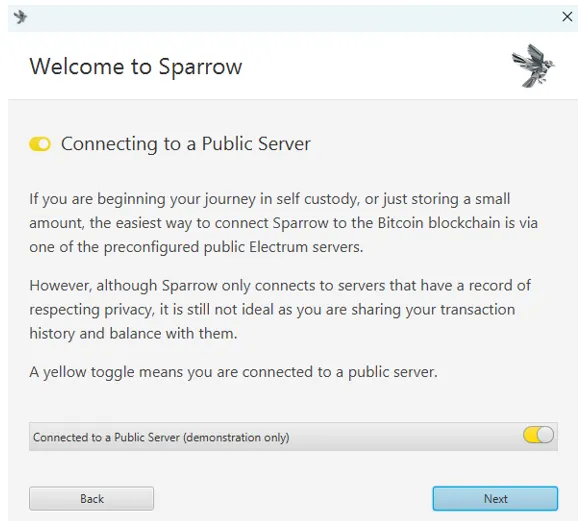
Sparrow wallet - Connecting to a public server
Sparrow wallet - Configuring the public server connexion

Select your hardware wallet

Click on “Create New Wallet” and choose a name for your wallet.
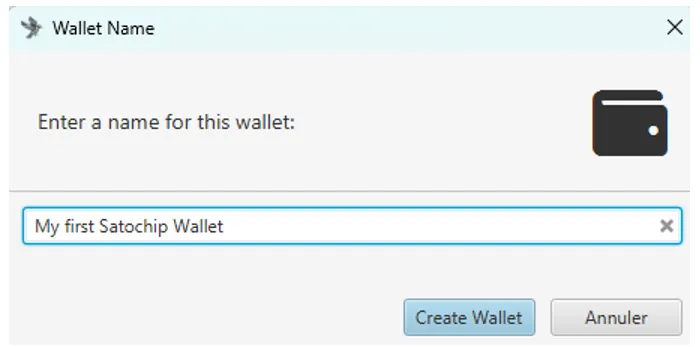
Sparrow Wallet and Satochip - Name your wallet

You will now see the Sparrow wallet Settings screen. You can leave all of the fields on the defaults and select “Connected Hardware Wallet”.

In the next step, your Satochip 🔗card will appear in the list of hardware wallets detected by Sparrow. At this stage of the procedure, be sure to leave your Satochip in the card reader and click on “Import Keystore”.
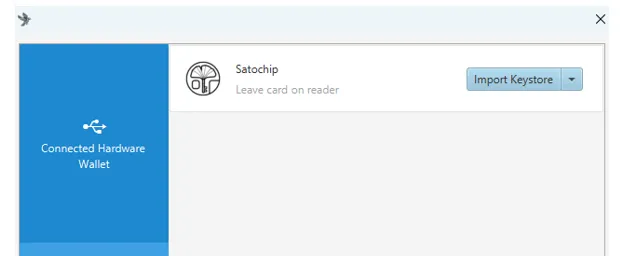
Sparrow Wallet and Satochip - Select your hardware device

Initialize your Satochip with a PIN code

To secure access to your Satochip hardware wallet, you will be asked to choose a PIN code. Obviously, this code must remain strictly personal to you. It’s also important to store it properly and securely. Sparrow Wallet will ask you to type it twice.

Once you’ve entered your PIN code, click again on “Import Keystore” to go to the next step.

Sparrow Wallet and Satochip - Set a pin code

Generate or import a mnemonic seedphrase

Now we come to the most important step of the procedure: creating or importing your recovery phrase, also known as seedphrase or mnemonic.

Here you have two choices:

  1. You already have a seedphrase? Import it into Sparrow Wallet by typing the 12 or 24 words. Be careful, however, not to import a seedphrase that has been poorly stored or stored in an unsecured environment (eg. unencrypted on your computer…)
  2. You don’t have a seedphrase? Click on “Generate New” and you’ll see the words that make up your recovery phrase. You’ll need to write them down and memorize them, then click on “OK” to finish setting up your Satochip hardware wallet.

We strongly encourage you to safely store your seedphrase in a secure device such as Seedkeeper 🔗. Your seedphrase is your backup solution for regaining access to your wallet and therefore to your funds. It’s important to store it in a safe place.
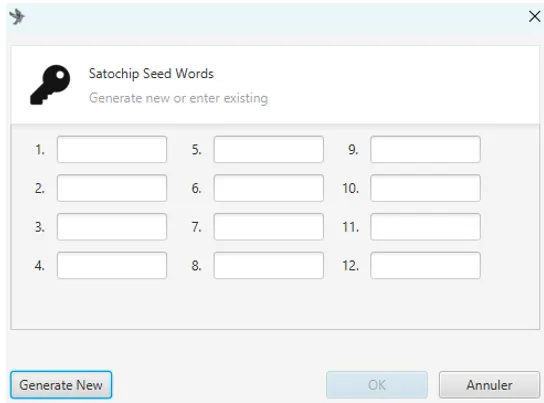
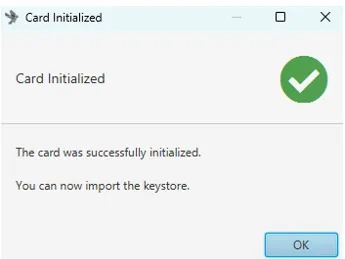
Sparrow Wallet and Satochip - Generate a seedphrase - Seedkeeper
Sparrow Wallet and Satochip - Setup your hardware wallet

Join the Satochip community

Ready to elevate the security of your crypto assets? Discover more about Satochip and join a community that values security, simplicity, and sovereignty in the crypto world. Visit our product page to embark on a journey of unmatched security and control over your digital assets.

To explore more on the functionalities and advantages of the Satochip hardware wallet or to embark on a journey of safe and secure crypto management, visit our product page.

Setup a Satochip hardware wallet with Sparrow

Setup a Satochip hardware wallet with Sparrow

Cold store your Bitcoin with Satochip and Sparrow

Introduction

This step-by-step tutorial explains how to setup a Satochip hardware wallet with Sparrow to create a secure Bitcoin cold storage solution. If you haven’t read the Sparrow Quick Start🔗 guide yet, that’s a good place to learn how to install and get introduced this amazing Bitcoin client.

Setting up your Bitcoin wallet with your Satochip smartcard

Once Sparrow is installed, you’ll need to insert your Satochip 🔗 card into your card reader, then launch the Sparrow application.
This brings us to the creation of your new bitcoin wallet.

Please note: as with any Bitcoin wallet creation, the process that follows will require you to save your recovery phrase (also known as seedphrase 🔗or mnemonic), so that you can recover access to your funds in the event of loss or theft of your hardware wallet. We suggest you to store your seedphrase using Seedkeeper; your seedphrases and password manager on a smartcard.

Connecting to a server

When you open Sparrow Wallet for the first time, you’ll be asked to choose between connecting to Electrum’s public or private servers. You don’t need to choose anything other than the public connection to quickly set up your wallet and carry out your first transactions.

If you run your own Bitcoin node and care about privacy and anonymity, you’ll probably choose to connect to your own — private — server.

You made your choice!? Great, let’s move on and click on “Create New Wallet” to choose a name for your wallet.

Sparrow wallet - Connecting to a public server
Sparrow wallet - Configuring the public server connexion

Select your hardware wallet

Click on “Create New Wallet” and choose a name for your wallet.

Sparrow Wallet and Satochip - Name your wallet

You will now see the Sparrow wallet Settings screen. You can leave all of the fields on the defaults and select “Connected Hardware Wallet”.

In the next step, your Satochip 🔗card will appear in the list of hardware wallets detected by Sparrow. At this stage of the procedure, be sure to leave your Satochip in the card reader and click on “Import Keystore”.

Sparrow Wallet and Satochip - Select your hardware device

Initialize your Satochip with a PIN code

To secure access to your Satochip hardware wallet, you will be asked to choose a PIN code. Obviously, this code must remain strictly personal to you. It’s also important to store it properly and securely. Sparrow Wallet will ask you to type it twice.

Once you’ve entered your PIN code, click again on “Import Keystore” to go to the next step.

Sparrow Wallet and Satochip - Set a pin code

Generate or import a mnemonic seedphrase

Now we come to the most important step of the procedure: creating or importing your recovery phrase, also known as seedphrase or mnemonic.

Here you have two choices:

  1. You already have a seedphrase? Import it into Sparrow Wallet by typing the 12 or 24 words. Be careful, however, not to import a seedphrase that has been poorly stored or stored in an unsecured environment (eg. unencrypted on your computer…)
  2. You don’t have a seedphrase? Click on “Generate New” and you’ll see the words that make up your recovery phrase. You’ll need to write them down and memorize them, then click on “OK” to finish setting up your Satochip hardware wallet.

We strongly encourage you to safely store your seedphrase in a secure device such as Seedkeeper 🔗. Your seedphrase is your backup solution for regaining access to your wallet and therefore to your funds. It’s important to store it in a safe place.

Sparrow Wallet and Satochip - Generate a seedphrase - Seedkeeper
Sparrow Wallet and Satochip - Setup your hardware wallet

Join the Satochip community

Ready to elevate the security of your crypto assets? Discover more about Satochip and join a community that values security, simplicity, and sovereignty in the crypto world. Visit our product page to embark on a journey of unmatched security and control over your digital assets.

To explore more on the functionalities and advantages of the Satochip hardware wallet or to embark on a journey of safe and secure crypto management, visit our product page.